Introduction to Pillow#
Pillow is the fundamental library for image processing in Python. It is a free and open-source third-party library developed by a group of volunteers from the Python community (main contributor: Alex Clark). Pillow is the successor to the PIL library. However, PIL only supports Python 2, and it was later ported to Python 3 by volunteers from the Python community and renamed Pillow. Pillow and PIL cannot coexist in the same environment.
Basic Knowledge#
This section requires a certain level of Python knowledge, as well as an understanding of color modes such as RGB.
Installing and Importing Pillow#
Installation command: pip install pillow
Import command: from PIL import Image
Image Class#
The Image class is the most important class in Pillow, and it can be used to instantiate Image objects.
Creating Image Objects#
When creating an Image object, you can either create a new image or choose to open an existing file.
You can create a new object using the new() method, with the following syntax:
img = Image.new(mode, size, color)
Parameter descriptions are as follows:
- mode: Image mode, a string parameter, such as RGB (true color image), RGBA (true color with transparency), L (grayscale image), CMYK (color print mode), etc.;
- size: Image size, a tuple parameter (width, height), representing the pixel size of the image;
- color: Image color, the default value is 0, which means black. The parameter value supports (R,G,B) tuple format, hexadecimal color values (e.g., '#66CCFF'), and color names. Note: The format of the parameter varies when different color modes are selected.
You can create a new object from an existing file using the open() method, with the following syntax:
img = Image.open(fp, mode='r', format=None)
Parameter descriptions are as follows:
- fp: File path, a string parameter;
- mode: Optional parameter, default is 'r', otherwise an exception will occur.
- format: File format, default is None, which means to open in the image's default format.
Attributes of Image Objects#
Common attributes of Image objects are as follows:
- size: A tuple that stores the size of the image.
- width: Width.
- height: Height.
- format: File format. The format of Image objects generated by the new() method is None.
- mode: The color mode of the image.
- readonly: Indicates whether the image is read-only, returning 0 or 1.
- info: View image-related information, in dictionary format.
Operation Functions for Image Objects#
save()#
The save() method is used to save an image. When the file format is not specified, it will be stored in the default image format; if a specific image format is specified, the image will be stored in that format. The syntax for save() is as follows:
img.save(fp, format=None)
Parameter descriptions are as follows:
- fp: File path;
- format: File format.
convert()#
In some cases, the save() method cannot save directly, for example, an image in RGBA color format cannot be saved as JPG. The convert() method can convert the color format of the image. Its syntax is as follows:
img1 = img.convert('RGB')
resize() and thumbnail()#
In practical use, you often encounter situations where you need to adjust the size of an image, and in this case, you will use the resize() method, which returns a new object. Its syntax is as follows:
img1 = img.resize(size, resample=image.BICUBIC, box=None, reducing_gap=None)
Parameter descriptions:
- size: Tuple parameter (width, height), the size of the image after scaling;
- resample: Optional parameter, referring to the image resampling filter, similar to the resample parameter of thumbnail(), default is Image.BICUBIC;
- box: Scale a specified area of the image, the box parameter value is a tuple of pixel coordinates of length 4, i.e., (left, top, right, bottom). Note that the specified area must be within the range of the original image; if it exceeds the range, an error will occur. When this parameter is not passed, the entire original image is scaled by default;
- reducing_gap: Optional parameter, a floating-point parameter value used to optimize the scaling effect of the image, common parameter values are 3.0 and 5.0.
When you need to create a thumbnail, you often use the thumbnail() method, which directly modifies the original object. Its syntax is as follows:
img.thumbnail(size, resample)
The parameters have the same meaning as those in the resize() method.
split() and merge()#
The split() and merge() methods serve to separate and combine color channels, respectively. The usage is as follows:
r, g, b = img.split()               # r, g, b are the grayscale images of each color channel
img1 = Image.merge('RGB', [b, g, r])  # Merge
Note that the images of each color channel need to be the same size; otherwise, they cannot be merged.
crop(), copy(), and paste()#
The crop() method is used to crop the original image in a rectangular area. Its usage is as follows:
img_crop = img.crop(box);
box: Indicates the cropping area, default is None, which means to copy the original image.
Note: box is a four-tuple, with each parameter representing the x, y coordinates of the upper left corner and the x, y coordinates of the lower right corner of the cropped rectangle. The default (0, 0) indicates the origin, with the width direction as the x-axis and the height direction as the y-axis, with each pixel representing one unit.
The copy() and paste() methods are used for copying and pasting. The copy() method is simpler, and here we mainly introduce the paste() method:
large_image.paste(image, box=None, mask=None)
This function pastes one image onto another. Note that the pasted image mode will automatically remain consistent, and no additional conversion is needed. Parameter descriptions are as follows:
- image: Refers to the image being pasted;
- box: Specifies the position or area where the image is pasted, with parameter values being a tuple sequence of length 2 or 4. Length 2 indicates a specific point (x, y); length 4 indicates the area where the image is pasted, and the size of this area must match the size of the image being pasted.
- mask: Optional parameter, adds a mask effect to the image.
GIF Images#
The uniqueness of GIF images lies in the fact that they are dynamic images, often containing many frames. Therefore, they have some special methods compared to formats like JPG and PNG.
Parameters for save()#
When saving GIF images using save(), there are more available parameters. Some parameters are as follows:
- save_all: Save all frames, generally set to True
- append_images: Frames following the first frame
- duration: Time interval between two frames, in ms
- transparency: Transparency, set to 0 for transparent
- loop: Number of loops, 0 for infinite loop
- disposal: Whether to dispose of the previous frame when playing the next frame; set to 2 for disposal
Example:
# Here, frame_list stores all frame information
frame_list[0].save('example.gif', format='gif', save_all=True, append_images=frame_list[1:], duration=50, transparency=0, loop=0, disposal=2)
tell() and seek()#
When accessing GIF images, only one frame can be accessed at a specific moment. The tell() method can be used to check the current frame number; the seek() method can be used to jump to the corresponding frame. However, if you access a non-existent frame, an EOFError will occur. Common usage is as follows:
try:
    while True:
        # Some processing operations
        img.seek(img.tell() + 1)  # Next frame
except EOFError:
    pass
This usage can traverse each frame of the GIF image.
Usage Example#
We will use the meme "Huaji"  to demonstrate some usage of the Pillow library.
Note: The example program may not be the optimal solution.
Meme Splicing#
The general idea of meme splicing is to create a suitably sized background and then paste the meme in the appropriate position. The code is as follows:
# This file is in the same directory as huaji.gif

from PIL import Image

img = Image.open('huaji.gif')
frame_list = []                         # Store the frames of the final GIF file
multiple = 9                            # Magnification factor

# Traverse all frames of the gif, and when reaching the last frame, an EOFError will be thrown, ending the program
try:
    while True:
        frame = img.convert('RGBA')             # Convert to RGBA color format
        frame_large = Image.new('RGBA', (frame.width * multiple, frame.height * multiple),
                                '#00000000')    # Create a background image with a side length that is multiple times the original
        for i in range(multiple):
            for j in range(multiple):
                frame_large.paste(frame, (frame.width * i, frame.height * j))   # Paste the background image at position [i, j]

        frame_list.append(frame_large)          # Add the current frame to the frame list
        img.seek(img.tell() + 1)                # Traverse to the next frame
except EOFError:                                # After reading the last frame
    pass


# save_all:         Save all frames
# append_images:    The subsequent images
# duration:         Time interval between two frames, in ms
# transparency:     Transparency
# loop:             Number of loops, 0 for infinite loop
# disposal:         Disposal, i.e., whether to clear the previous frame when playing the next frame

frame_list[0].save('huaji_enlarged.gif', format='gif', save_all=True,
                    append_images=frame_list[1:], duration=50, transparency=0, loop=0, disposal=2)
The effect is shown in the following image:
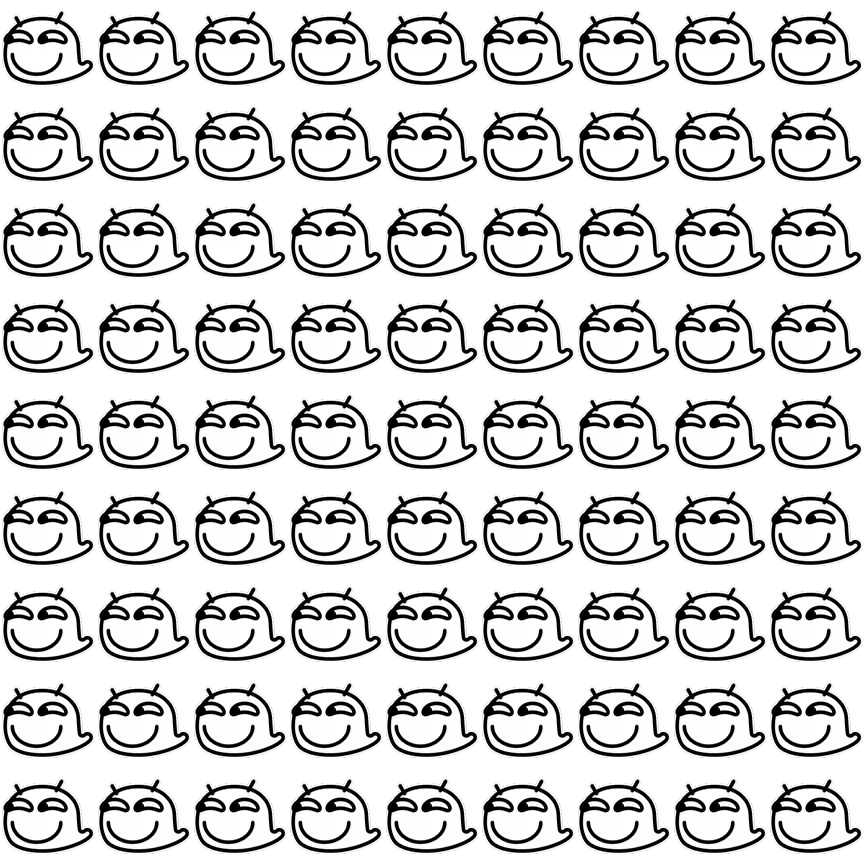
Meme Color Modification#
In this program, the method for modifying the meme's color is to change the color of each pixel. The code is as follows:
# This file is in the same directory as huaji.gif

from PIL import Image


# Multiply the original color by the target color and return
# RGBA color is represented as a four-tuple (r,g,b,a), where r,g,b,a all need to be mixed
def to_color(color, target) -> tuple:
    'Change to target color.'

    temp = []
    for i in range(len(color)):
        temp.append(color[i] * target[i] // 255)    # The mixing method is to multiply by the target color and then divide by its maximum value
    return tuple(temp)


# Open the image
img = Image.open('huaji.gif')
frame_list = []
green = (0, 255, 0, 255)

# Traverse all frames and dye them
try:
    while True:
        frame = img.convert('RGBA')
        pixels = frame.load()               # The pixels of the original image, modifying them will also modify the original image
        for i in range(frame.width):
            for j in range(frame.height):   # Modify the color of a single pixel
                pixels[i, j] = to_color(pixels[i, j], green)
        frame_list.append(frame)
        img.seek(img.tell() + 1)            # Next frame
except EOFError:                            # All traversed
    pass

# Save the image
frame_list[0].save('huaji_green.gif', format='gif', save_all=True,
                   append_images=frame_list[1:], duration=50, transparency=0, loop=0, disposal=2)
Effect display:

Meme Pixel Art#
By combining "Meme Splicing" and "Meme Color Modification," we can achieve the "Meme Pixel Art" functionality. The effect of meme pixel art is that each pixel of the image is replaced by a corresponding colored meme according to its position.
For the sake of image file size and display effect, the base image size is set to 40x40, and the size of the meme used for replacement is set to 20x20. The code is as follows:
# This file is in the same directory as huaji.gif

from PIL import Image


# Multiply the original color by the target color and return
# RGBA color is represented as a four-tuple (r,g,b,a), where r,g,b,a all need to be mixed
def to_color(color, target) -> tuple:
    'Change to target color.'

    temp = []
    for i in range(len(color)):
        temp.append(color[i] * target[i] // 255)    # The mixing method is to multiply by the target color and then divide by its maximum value
    return tuple(temp)


# Convert the color of a single shape
def shape_to_color(original_image, color):
    image = original_image.convert('RGBA')          # Here, convert is needed to copy a new object,
                                                    # otherwise the modified object is original_image
    shape_pixels = image.load()
    for i in range(image.width):
        for j in range(image.height):
            shape_pixels[i, j] = to_color(shape_pixels[i, j], color)
    return image


base_size = (40, 40)
shape_size = (20, 20)

img_base = Image.open('huaji.gif')      # Base image
img_shape = Image.open('huaji.gif')     # Shape image for replacement

shape_list = []                         # Store the frames of the replacement shape
frame_list = []                         # Store the frames of the final output meme

# Get the frames of the replacement shape
try:
    while True:
        shape = img_shape.convert('RGBA').resize(shape_size)
        shape_list.append(shape)
        img_shape.seek(img_shape.tell() + 1)
except EOFError:
    pass

# Generate pixel art frames
try:
    while True:
        frame = img_base.convert('RGBA').resize(base_size)
        shape = shape_list[len(frame_list) % len(shape_list)]   # Get one frame of shape in a cyclic order
        frame_large = Image.new('RGBA', (frame.width * shape.width, frame.height * shape.height),
                                '#00000000')
        pixels = frame.load()
        for i in range(frame.width):
            for j in range(frame.height):
                new_shape = shape_to_color(shape, pixels[i, j]) # Convert the color of a single shape
                frame_large.paste(new_shape, (i * new_shape.width, j * new_shape.width))
        frame_list.append(frame_large)                          # Add the current frame to the frame list
        img_base.seek(img_base.tell() + 1)                      # Traverse to the next frame
except EOFError:
    pass

# Save the image
frame_list[0].save('huaji_pixels.gif', format='gif', save_all=True,
                   append_images=frame_list[1:], duration=50, transparency=0, loop=0, disposal=2)
The effect is shown in the following image:

References#
Tutorials#
Pillow (PIL) Beginner's Tutorial (Very Detailed)
Python Image Processing Pillow Library Basics
Documentation#
stable version: Pillow stable version
latest version: Pillow latest version